Friday, August 27, 2010
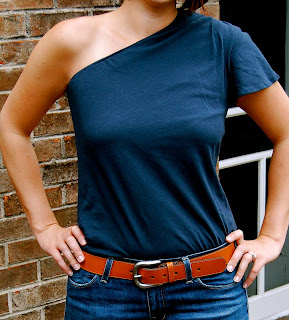
The "Um, you're missing a sleeve" Top
That was my husband's comment about this top. I'm not sure what possessed me to make this top, Simplicity 2364. Curiosity, I guess? I always wondered if I would like the one shoulder style or if I'd be able to wear it. The jury is still out. But here are my observations about this pattern. I made view F.
Making up a pattern that is asymmetrical is hard! Most patterns pieces are symmetrical and if you are using a fabric that is the same front and back, it doesn't matter too much if you get one mixed up or reversed. In this case, you have to remember which piece is which, back and front, and not get them flipped over. I mixed them up once and had to unpick everything. I guess that is where marking your pattern pieces well comes in.
Everything else about the pattern was pretty straightforward. I like that the elastic casing was made within the seam allowances. I also like the gathering along the shoulder seam. I didn't like that the facings stopped halfway down and there were no instructions on how to finish or if you were supposed to tack it anywhere inside. You can see how it bunches up in my back view photo. My advice is to just double up on the front and back pieces and sew as a full lining instead of a facing. I'm not sure if I will actually wear it, but it was another good experience with something new.
Sunday, August 22, 2010
Popover Dresses
I made up these Oliver and S popover dresses this week for a first birthday present. The pattern is wonderful- super easy and free, can't beat that! But the smallest size on the pattern is a 2, which I'm gathering is a 2T from what I've read about the pattern online. I don't have any small children around to measure and I honestly have no concept of how big a one year old is. It's hard to picture! So I attempted completely altering the pattern to fit a one year old. I think my method was right in theory but it only ended up working out because of a lot of trial error.
I read somewhere online (I apologize I can't remember where) about sliding the pattern pieces and retracing the curves to resize. I know this is not the proper way to do it, especially on more complicated patterns, but since this pattern basically only two pieces and some bias binding I figured this method would work. But where to find the average chest width of a one year old? I won't tell you all the strange body part measurements that turned up when I typed that in to a search engine.
I searched for a long time until somewhere I read that the average chest width of a one year was 18 inches. The chest width on the pattern size 2 is 22.5 inches. So I estimated that if I took one inch off the side, that would take off 4 inches total. Sounds logical, right? I slid the pattern pieces over and retraced about one inch in. I wasn't being completely precise about it because I figured the style of pattern probably had enough ease to fit anyway. I guesstimated a little on the top, keeping the curve. I also took off 5 inches of length because that was the difference in height of a one year old and a size 2T. I used my resized pattern pieces and cut the light pink dress and the yellow one at the same time. I sewed the light pink one first and when I was done I held it up-- and it was tiny! I knew it would be too small.
I went back to the drawing board and did some more research. I had the bright idea to look at measurements of clothing sizes on Gymboree instead of randomly searching online. They list the average chest width of a 12 month old as 19.5 inches- big difference! So I retraced the pattern again. This time adjusting the measurements to end up fitting 19.5 inches, being a little more generous than before, and also adding a little more length because the light pink one look short. I made the bright pink one from the larger adjustment. It looked right to me.
I still had the pieces for the yellow dress already cut out from before, so I decided to go ahead and sew it up. I sewed all the seam allowances as small as I could to make it a bit larger. In the end, I ended giving the yellow dress and bright pink dress as the gift. I'm interested to find out which one fits! I also have a lucky coworker with an adorable six month old that's going to get the little pink one.
So these were my adventures in resizing a child's pattern! I'd love to get my hands on a copy of The Perfect Fit and learn about resizing for real. All in all, I enjoyed the pattern. It was simple and quick and a great way to use smaller pieces of leftover fabric.
Monday, August 16, 2010
Simplicity 3833, Take 2
I know, I know... I know what you are thinking. Quilting cotton? Super busy print? Hmmmm.
I had this wild cotton print in my stash all summer and was at a loss for what to do with it. I'm not even sure what I bought it for. I know that bright, busy prints are not always the most flattering when it comes to apparel, but for some reason I'm drawn to crazy prints- the more color the better it seems. I crave some color sometimes- might have something to do with my profession :). I figure it's okay to use a bright print if the pattern is simple and not very sophisticated. I used Simplicity 3833, a 1960's reprint, which I have already sewn once in a knit. I love the a-line shape of the dress and the back belt that cinches it in at the waist. ( I'm wearing a thrifted belt in a couple of the pictures.) I also like this pattern because I don't have an issue with the back fitting me across the shoulders like I do with most patterns. There are two nifty little darts at the back neckline that seem to do the trick. Maybe I should try putting neck darts in on other patterns when I'm having fit issues.
I made a few adjustments to the pattern this time around. I've learned that I need to cut a size smaller on top than bottom almost all of the time. I'm still not very good at long zippers (read: don't have the patience for them) so I try and omit wherever possible. I left out the zipper and made a key hole using a leather button and loop at the back of the neck. I just made the neck opening big enough to fit my head. I look a little funny wriggling in to the dress, but once it's on it fits great! Making the loop was a learning experience. I spent an hour trying to turn one little loop- one little loop. I've never been so frustrated in my life. Who would have thought turning a little loop could be so difficult? Then, I turned to my sewing bible- the Internet- and found an awesome tutorial on turning a loop or spaghetti strap with a bobby pin. If you haven't seen this, look. It was life changing-- so easy. I also added in seam pockets. Every dress should have pockets.
I realize that it's not always a good idea to use quilting cotton for apparel, but it's hard to resist a really cute print sometimes. I'm trying to educate myself about different types of fabric, mainly by trial and error, and what I've learned about quilting cotton is that the weave is somewhat coarser than, say, a cotton shirting which means it doesn't drape as nicely and also wrinkles easily (correct me if I'm wrong). I'm started to gravitate towards fabrics that have a nicer drape and I'm also trying to use fabrics I've never sewn before. Linen is my favorite so far and there are many synthetics I've never tried. Any suggestions?
Monday, August 9, 2010
Reflection is good...
It's back to school time for me. Even after teaching for several years, I still feel that rush of excitement for a new year along with some anxiety, too. You get to start out fresh- it's almost like having a clean slate every year. But I also like to look back on the last year for reference.
So, while reflecting on the last twelve months of my life I realized just how crazy the past year was for me. The most obvious craziness was planning a wedding and getting married in the middle of the school year. I also went from being full time art teacher to being split between two schools; four days at my home school and one day at another school. Then came house hunting, purchasing a home and trying to fix up the new house (still working on that) and old house at the same time, and then trying to rent the old one. There were all sorts of big occasions and projects going on all while trying to keep up with work and keeping a smile on my face! I did it, though. And I think I know why.
I also began sewing last summer. Even though I had very little time to relax amidst all the craziness, I managed to spend lots of time learning to sew- and loving every minute of it. I even sewed clutches for all of my bridesmaids right before the wedding. Not sure how I found the time to do it, but I did. And I think that's because sewing is really an outlet for me. It's time spent just doing something I enjoy-- and just for the simple fact of enjoying it, nothing else. Time well spent! I think sewing is what kept me sane last year.
Anyway, as I start this new school year my goal is to keep sewing-- to make it a priority and keep up with my pledge to make it myself. I feel the same way about painting, which I've done very little of the past few years, so I also want to make art a priority. I guess it's all part of that desire to create. I started thinking about all of this last week at an arts integration workshop where I did the painting pictured. It's just a quick blind contour drawing of a hydrangea blossom painted with watercolor. It sort of started this whole reflection on sewing and making art because it made me realize just how much I enjoy doing both of these things. After all, how can you be a good art teacher if you're not an artist, too?
Friday, August 6, 2010
Hmmm, Amy Butler...
Hmmmm, Amy Butler. You have nice fabric, kind of pricey, but I can't say I'm too thrilled with your patterns.
I made the Lotus Cami. This is the first Amy Butler pattern I've sewn and it did not go well. Now, I'll be the first to admit that sometimes I don't always follow the directions so I could of screwed something up. But I have gone back through the directions several times and can't find where I did anything wrong. I cut a "M" which the claims a 36" bust and 40.5" hips. I thought that was a good size to cut since my measurements are just slightly under those. The construction was fine. Even though it's really hard to ease all those curves together, I like the shape it gives the top in the end.
But, when I finished it all and went to go put on my new top, it was too small. Not just a little bit small-- super duper, teeny tiny small. Not just kind of tight-- it wouldn't even meet up in the back to button. Not only did it not go around me, but the armholes felt kind of small, too. I usually add some length to the middle because I'm long in the torso, but I didn't on this top for some reason. I wish I had. I feel like that has something to do with the armholes feeling small and the waist not quite hitting me at the waist. I was determined to "make it work" so I ended up ripping out all sorts of seams. I took out the back darts completely and I redid the placket on the back at less the half the width they recommended. I also sewed the side seams with a smaller seam allowance, down to about 1/4" to 3/8". I even sewed the facings in another 1/4" on the armholes to make them slightly larger. To be fair, I did notice after the fact that the pattern makes the note that all seam allowances are 1/2" (in very large print and at the top of the pattern- oops). I initially sewed all seams at 5/8" as I normally do. Could 1/8" make that much of a difference? Maybe so.
After I became frustrated I just sort of slapped it together determined to finish. My seams are a little sloppy, but I also used a really cheap cotton blend broadcloth which made it hard to get all those curves right. I guess you could say this is a wearable muslin, though I won't be making this top again. All in all, I'm happy enough to actually wear the cami, but I'm not happy with the amount of work it took to make it fit. My only complaint now is that it's not quite long enough through the middle. The bust could be lower, I think. I like certain features about it. I love the working buttons up the back and the neckline, but the sizing of the pattern is just---- weird! Or maybe it's my body that's weird- I notice strange things as I get closer to 30 :). I've had trouble with fitting dresses lately, too. Valerie gave me some good advice so I'm going to work on finding an adjustment I can make to patterns to make them fit me through the shoulders. My grandmother was an excellent seamstress and her strength was fitting the things she made. I'd like to learn as much about fitting as I can. Thanks for reading!
Subscribe to:
Posts (Atom)